Whether or not it be for your vehicle, domestic theatre, or transportable device. A Fit speaker can cause sound distortion, inefficiency, and even hardware damage over the years. Ensuring a particular match isn’t pretty much length, however, also includes matching power ratings, impedance, enclosure type, and connection compatibility. This article seeks to provide a complete overview for each person asking the question: how do I fit my speaker?
Measuring the Space Before You Fit My Speaker
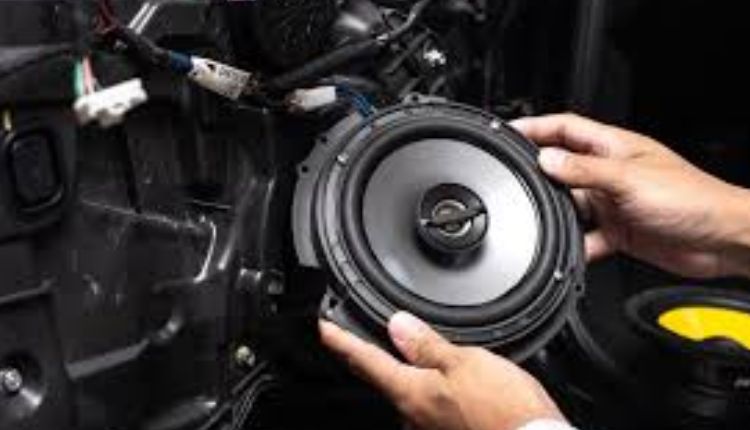
One of the first steps in becoming a speaker is measuring the available space. If it’s an automobile speaker, this consists of the door panel, rear deck, or dashboard dimensions.
For domestic audio structures, you need to measure your shelf, Fit my speaker, or wall mount spacing. Use a measuring tape to word height, width, and intensity appropriately. Remember to leave extra room for air circulation and wiring, specifically in case you’re installing large subwoofers or amplifiers. Measurements need to be particular to keep away from any destiny installation problems or vibrations that would affect sound clarity.
Matching Speaker Size and Shape
Speakers are available in various dimensions and shapes, which include round, oval, rectangular, or even custom designs. Most automobile speakers are standardised into sizes like 6.5”, 6×9”, or 5.25”, even as home speakers vary broadly, relying on emblem and type. Always evaluate your measurements with the manufacturer’s specification sheet. Make sure that the mounting holes align properly and that the form of the speaker enhances the cultural and structural necessities of your setup. Choosing a speaker that’s too massive or too small can create acoustic imbalances and reduce sound fidelity.
Ensuring Electrical Compatibility Before You Fit My Speaker
Size and form are just the start. Electrical compatibility is similarly vital. Every Fit my speaker has a selected impedance rating, typically 4, 6, or 8 ohms, and an electricity-managing ability measured in watts RMS and peak power. Your amplifier or head unit needs to fit these specifications to keep away from blowing the speaker or underpowering it, which can result in poor sound output. Check each of the impedance and wattage compatibility before finalising your speaker setup. Using a multimeter can help affirm your present wiring’s resistance values.
Choosing the Right Speaker Mounting Hardware
Proper mounting hardware is important to secure your Fit my speaker and keep it away from vibration or motion for the duration of use. Most speakers come with their very own mounting screws, brackets, and adhesive tapes; however, not all could be compatible with your specific installation surface.
Use a mounting adapter or baffle ring if the hollow size doesn’t fit. Foam gaskets can also assist in creating a tighter seal and enhance sound nice by reducing sound leakage. Loose fittings can cause damage or even physical harm, particularly at high temperature ranges.
Wiring and Polarity Considerations to Fit My Speaker Correctly
After mounting the Fit my speaker, the subsequent vital step is wiring. Always make sure the high-quality and bad terminals are related properly to maintain phase consistency. Reversed polarity can cause distorted bass and reduced sound output. Use pleasant speaker twine with a suitable gauge size, commonly between sixteen and twelve gauges, depending on the energy requirement and distance from the supply. Secure all wire connections with crimp terminals or soldering, and cover uncovered wires with heat shrink tubing or electric tape for added safety.
Sealing and Insulating the Enclosure Properly
Whether you’re installing a speaker in a car door, a subwoofer box, or a wall cavity, proper sealing makes a massive difference in sound performance. Use sound-deadening fabric like Dynamat in car installations to reduce avenue noise and enhance speaker output. In home structures, don’t forget acoustic panels or foam insulation to limit resonance and echo. A tightly sealed enclosure improves bass response and forestalls sound distortion as a result of air leaks or cabinet vibration.
Testing the Speaker After Installation
Once your Fit my speaker is outfitted and wired, trying it out is critical. Play more than a few audio content materials that consist of highs, mids, and lows to evaluate the general sound overall performance. Listen for readability, distortion, or damn noises, and make adjustments to mounting hardware or twine connections if necessary. Some customers may use a frequency sweep or sound calibration software to ensure balanced audio output throughout the spectrum. Always test at a mild extent first to avoid the speaker being negative throughout the initial run.
Using Fit My Speaker Tools and Online Databases
There are many online resources designed that will help you determine what speakers suit your automobile or room layout. Websites like Crutchfield and Sonic Electronix provide “Fit My Speaker” equipment wherein you could enter your car’s make, version, and year to locate well-suited speakers. This equipment additionally offers setup courses and compatibility notes, saving time and decreasing installation errors. For domestic structures, boards, and AV network discussions, you frequently have precise diagrams and product compatibility opinions that may guide your speaker choice.
Common Mistakes to Avoid When Trying to Fit My Speaker
One of the most important errors people make is assuming that any speaker will work as long as it physically fits in the hand. Ignoring electric compatibility, failing to use the correct mounting hardware, or damaging wiring can all result in subpar sound satisfaction or permanent damage. Another not-unusual error is overloading small enclosures with excessive-wattage speakers, which results in overheating and negative bass performance. Always research very well and plan your installation technique in advance before beginning.
When to Seek Professional Help to Fit My Speaker
If you’re managing complicated audio systems, custom enclosures, or highly priced high-end Fit speakers, it is probably well worth hiring an expert installer. Certified audio technicians have the gear and expertise to ensure excellent health, correct wiring, and the most advantageous sound tuning. This is in particular genuine for in-dash vehicle systems, ceiling-mounted speakers, or multi-region domestic theatre setups. While a DIY setup is achievable for most customers, a professional installation guarantees long-term overall performance and reliability.
Wrapping It Up
Fitting your speaker correctly lays the foundation for a first-rate sound gadget. But to take your setup to the subsequent stage, consider including components like an amplifier, subwoofer, or DSP (Digital Signal Processor) for better sound customisation. Once your speakers are outfitted and performing properly, upgrading your supply unit or tweaking equaliser settings can appreciably elevate your audio experience. Keep your audio system well-maintained and sometimes check the mounting and wiring to ensure longevity and the most useful features.